Upgrading and improving the older CG5 MountThe older CG5 mount is one of the best values for the money on the market today, (if you can find one) but it is notorious for a couple of problems that are easily fixed. You can pick up a used one for about $250, but be prepared to do a little work on it. The drive (below) is available from several sources for about $150. The motors attach to each axis and the hand control allows slewing at 2X 4X and 8X speeds in any one of four directions. When the unit is turned on, it automatically tracks the stars at the sidereal rate. A 6V battery pack holds four D cells.
|
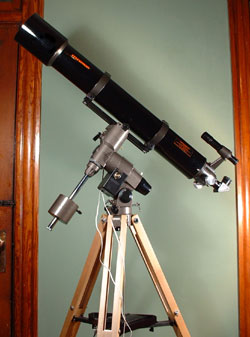
Note the wooden tripod. Not only is it much nicer looking than the original aluminum, but it is more stable and allows vibrations to dampen out much more quickly. This one is maple. The light color makes it easier to see and harder to trip over in the dark. Sources for wooden tripods include: Astronomyboy.com. You can also build one yourself by following these simple plans: Making a Sturdy Wooden Tripod. |
|
The old CG5 mount was lubricated with a substance that thickens like glue in cold weather. The gears become so locked up that they won't even turn under power from the motors. This problem is covered in detail on a number of sites, and one site in particular gives precise instructions for dismanteling, deburring, and relubricating the mount. It takes about four hours if you haven't done it before but the result is more than worth the time. I used a lithium based marine lubricant, and the result is that you can turn the gear axles with your fingers, even in the cold. Complete instructions for overhauling this mount may be found at www.astronomyboy.com. |
|
|
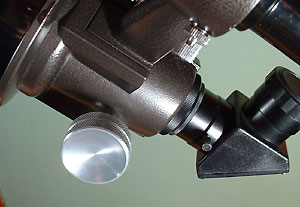
A simple upgrade to the telescope itself: replacing the plastic focusing knobs with a pair of precision machined aluminum knobs. Not only are the knobs easier to see in the dark, but it's easier to focus more precisely. The knobs are hard to find anymore. Orion used to supply them. You can sometimes find a pair on Astromart. |

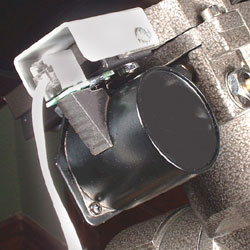
 Here's a modification that
I haven't seen mentioned anywhere else. This is the most fragile part
of the mount. The connector on the declination drive is just a thin piece
of circuit board with a telephone jack soldered onto it. The board sticks
out into space, unsupported. After a number of users reported that this
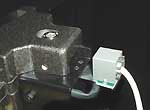
small connector had broken off, I fashioned this protective cover to keep
it from getting damaged. The small wooden brace underneath keeps it from
flexing downward and breaking from tugging on the cord (see photo below).
The cover can easily be made by bending a small square of aluminum. Two
holes are drilled directly into the bracket on the mount and threaded
to accept two small screws. Don't worry about drilling the holes in your
mount since the cover will probably never be removed. You could also superglue
it on, but the screws are more permanent.
Here's a modification that
I haven't seen mentioned anywhere else. This is the most fragile part
of the mount. The connector on the declination drive is just a thin piece
of circuit board with a telephone jack soldered onto it. The board sticks
out into space, unsupported. After a number of users reported that this
small connector had broken off, I fashioned this protective cover to keep
it from getting damaged. The small wooden brace underneath keeps it from
flexing downward and breaking from tugging on the cord (see photo below).
The cover can easily be made by bending a small square of aluminum. Two
holes are drilled directly into the bracket on the mount and threaded
to accept two small screws. Don't worry about drilling the holes in your
mount since the cover will probably never be removed. You could also superglue
it on, but the screws are more permanent.