How To Build a German Equatorial Mount (GEM)
Easier to build, easier to use, and less expensive than a Dobsonian!
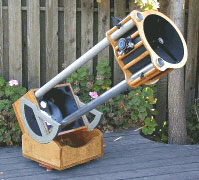 So why do people build Dobsonians (like the one at left) more often than GEMS (the one below)? Probably because
many people have woodworking equipment but few people have a metal lathe. To build the GEM shown below you will need to cut the threads
off some of the pipe on a lathe, or take it to a shop to have it done.
So why do people build Dobsonians (like the one at left) more often than GEMS (the one below)? Probably because
many people have woodworking equipment but few people have a metal lathe. To build the GEM shown below you will need to cut the threads
off some of the pipe on a lathe, or take it to a shop to have it done.
Pictured at the left is a magnificent
Dobsonian telescope. (I didn't build it). It's certainly more
beautiful than a GEM, especially if you like fine wood and a beautiful finish. But a Dobsonian has a number of problems
that the GEM does not have. First, since the Dobsonian is basically an alt-az mount, you have to push it in two directions
at once to follow the arcing movement of the stars through the sky. This becomes a problem when you are viewing at higher powers, since
objects move more quickly across your field of view as the earth turns. Secondly, the Dobsonian
is very difficult to manage when it is pointed nearly straight up. When the tube is aligned with the bottom box, you have to move
it a little more carefully by nudging the box as well as the tube. This becomes a big problem if you are
trying to view a planet or lunar object at high power. This problem can be overcome by building
or buying a motorized equatorial platform that sits under the Dobsonian and effectively converts it into an equatorial amount. If you
don't mind spending an extra 300-600 dollars, this is an effective solution. For visual observation with a GEM, it isn't
necessary.
 The 8-inch f/8 reflector in the back was one of my first scopes.
Its f/8 focal length made the tube over 64 inches long. This allowed me to use a tiny, 1/2-inch secondary mirror with
a low-profile focuser. It was the best planetary reflecting scope under 12-inches of aperture that I have ever looked
through. It was built with a used Edmund Scientific mirror that I bought at an astronomy flea market for ten dollars.
The tube was made from a concrete form (sonotube) and the mount was built entirely of 2-inch plumbing parts. The
setting circles and focuser came from Jaegers Optical way back when. The legs consist of three wooden triangles bolted
to the post. Total cost of this scope in 1971: eighty dollars.
The 8-inch f/8 reflector in the back was one of my first scopes.
Its f/8 focal length made the tube over 64 inches long. This allowed me to use a tiny, 1/2-inch secondary mirror with
a low-profile focuser. It was the best planetary reflecting scope under 12-inches of aperture that I have ever looked
through. It was built with a used Edmund Scientific mirror that I bought at an astronomy flea market for ten dollars.
The tube was made from a concrete form (sonotube) and the mount was built entirely of 2-inch plumbing parts. The
setting circles and focuser came from Jaegers Optical way back when. The legs consist of three wooden triangles bolted
to the post. Total cost of this scope in 1971: eighty dollars.
I later built a 4-inch f/4 scope for my five-year old son. It seemed just the right size for him. He never tired of using it.
The components came from Coulter Optics in 1981and cost a total of thirty-five dollars.
The little Tasco refractor in the background was later sawn in half and made into a finder scope, a fitting end for
this scope.
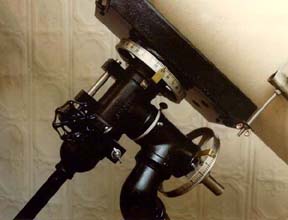 The two-inch iron pipe that I used for the mount was
painted black and fitted with a threaded rod to fine-tune manual tracking. I thought the water-spigot handle
was appropriate. It was also cheap and available. (It was 1977 and I was going for low-tech). I cut the
setting-circle indicators out of brass and later added a red LED underneath each one to illuminate the setting
circles. The spacers between the two pipe "T's" were cut from a sheet of white nylon that I found somewhere.
My guide in the construction of this cutting-edge piece of technology was Sam Brown's
Telescopes You Can Build.
The two-inch iron pipe that I used for the mount was
painted black and fitted with a threaded rod to fine-tune manual tracking. I thought the water-spigot handle
was appropriate. It was also cheap and available. (It was 1977 and I was going for low-tech). I cut the
setting-circle indicators out of brass and later added a red LED underneath each one to illuminate the setting
circles. The spacers between the two pipe "T's" were cut from a sheet of white nylon that I found somewhere.
My guide in the construction of this cutting-edge piece of technology was Sam Brown's
Telescopes You Can Build.
This telescope, with an equatorial mount, is as easy to build as a Dobsonian.
it is also much easier to use. I have never understood the attraction for the Dobsonia when this type of mount works so
much better, except that perhaps stained and finished wood is better looking than cast iron pipe.
A GEM, by its nature, only has to be moved in one plane to follow an object. Once the axis of the mount is aligned with the
axis of the earth, you only have to push the mount in one direction to follow the arc of the stars or a planet through the heavens.
Even when the tube is pointed straight up, this is easy to do. You can observe detail on a planet's surface at 400 power or more
(seeing conditions permitting) and follow the rapid path of the planet across your field of view with a gentle pressure on the eyepiece
holder. Try that with a Dob!
 I've added two setting circles and a fine adjustment to move the scope in declination, but I found that in actual use, neither of these are
really necessary. The setting circles are a must if you use a star chart and find objects by using their RA and Dec, but I usually just star-hop.
To set the scope up for your Longitude, simply pull the RA axis out of the T, sight through the T, and twist the street elbow until
the pole star appears centered in the T. You can also mount a polar finderscope in a wooden dowel and insert it into the T for much more accurate alignment.
For visual use, this really isn't necessary, even at higher powers. Normally, when I set up, I just sight the pole star and put a wedge under one
leg if I am on uneven ground. You can also put leveling feet on each leg, which is neater looking but takes more time to adjust when setting up.
I've added two setting circles and a fine adjustment to move the scope in declination, but I found that in actual use, neither of these are
really necessary. The setting circles are a must if you use a star chart and find objects by using their RA and Dec, but I usually just star-hop.
To set the scope up for your Longitude, simply pull the RA axis out of the T, sight through the T, and twist the street elbow until
the pole star appears centered in the T. You can also mount a polar finderscope in a wooden dowel and insert it into the T for much more accurate alignment.
For visual use, this really isn't necessary, even at higher powers. Normally, when I set up, I just sight the pole star and put a wedge under one
leg if I am on uneven ground. You can also put leveling feet on each leg, which is neater looking but takes more time to adjust when setting up.
For a weight, just get a barbell weight from your local sporting goods store and secure it with a hose clamp. Low tech, cheap, effective.
Another advantage of this type of mount is that now you can play with really long focal lengths. Build that f/6 or f/8 planetary
scope you've always dreamed about. It's suddenly manageable because of the simplicity of this mount. And it's about ten thousand dollars cheaper
than an apochromatic refractor, which is what you would need to equal the image quality you will get with a scope like this.
If you build a planetary scope, be prepared to amaze your astronomer friends at star parties and be prepared to be spoiled for life.